ATX Bench Power Supply
There have been many occasions at home whilst playing with electrickery that I've needed a decent power supply, so I thought about buying a bench power supply. However, the cheapest decent one was going to be £120 for a dual 30V output at 3A.
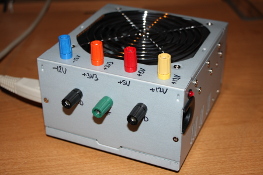
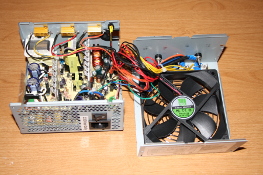
So, as a cheaper (and more powerful) alternative, I bought an ATX power supply from Maplin and set about converting it into a usable bench supply.
The power supply is rated at 680W. Each of the main supplies can deliver far more current than the binding posts (15A), so I've effectively got +12V, +5V and +3V3 at 15A capacity (the PSU has maximum ratings of 26A, 24A and 56A respectively - obviously they all can't draw their maximum at the same time as that would exceed 680W) and -12V at 0.8A.
Being an engineer who likes to do things right, I was wanting to get 4mm "banana" binding posts in the right colours (i.e. the same colours as in the ATX power cable). I spent ages trying to find somewhere that stocked the full set in the same style. Eventually, I found what I wanted at Digi-Key.
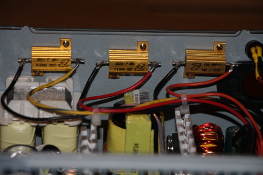
Knowing that most switch-mode power supplies don't like to be under-loaded, I added a 10Ohm resistor to each of the main supplies (+12v, +5V and +3V3). Remember to cater for the highest power... the +12V:
P = V2 / R
= 122 / 10
= 144 / 10
= 14.4W
I say this because I've seen many examples on the web of people using a 10W resistor - quite clearly that's going to melt!!!
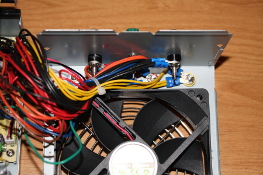
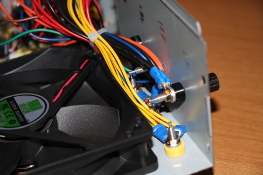
I'm not going to give detailed instructions and measurements here, because at the end of the day, you may not end up with the same power supply and hence you'll have to find your own layout for binding posts and resistors to suit the unit. However, in a nutshell:
- Dismantle PSU
- Cut off PC connectors leaving the wires long enough for purpose
- Mark out and drill holes for binding posts
- Mark out and drill holes for resistors[*1]
- Fit resistors (they will get hot, hence needing to be mounted)
- Wire up resistors
- Add crimps to power wires
- Wire up binding posts [*2]
- Re-assemble the box
- Switch it on and hope you've done it right
[*1] I used an M3 x 0.5mm tap on the resistors to allow me to use some standard M3 screws - the ones that you'd normally screw a motherboard into the case with.
[*2] Don't forget that unless you have another switch on the front / top, you'll need to connect the green "Power On" wire to ground.
Parts List
| Item | Vendor | Part Number | Unit Price |
Qty | Total Price |
|---|---|---|---|---|---|
| G7 680W ATX PC Power Supply | Maplin | N33HC | £26.99 | 1 | £26.99 |
| Stick On Feet, Square, 21mm, pack of 4 | Maplin | FD75S | £1.69 | 1 | £1.69 |
| Pomona Electronics 15A 4mm binding post Blue (3760-6) |
Digi-Key | 501-1650-ND | £2.73 | 1 | £2.73 |
| Pomona Electronics 15A 4mm binding post Orange (3760-3) |
Digi-Key | 501-1660-ND | £2.73 | 1 | £2.73 |
| Pomona Electronics 15A 4mm binding post Red (3760-2) |
Digi-Key | 501-1095-ND | £2.73 | 1 | £2.73 |
| Pomona Electronics 15A 4mm binding post Yellow (3760-4) |
Digi-Key | 501-1747-ND | £2.73 | 1 | £2.73 |
| Pomona Electronics 15A 4mm binding post Black (3760-0) |
Digi-Key | 501-1094-ND | £2.73 | 2 | £5.46 |
| Pomona Electronics 15A 4mm binding post Green (3760-5) |
Digi-Key | 501-1506-ND | £2.73 | 1 | £2.73 |
| TE Connectivity Chassis Mount Resistor 10 Ohm, 5%, 16W (1625966-4) |
Digi-Key | A102114-ND | £2.04 | 3 | £6.12 |
| TE Connectivity Connection Ring, Crimp Blue, 14-16AWG, #8 / M4 stud (2-320565-1) |
Digi-Key | A1071TR-ND | £0.09 | 15 | £1.41 |
| Grand Total | £55.32 | ||||
Of course, if you happen to have a spare ATX power supply lying around, then you can half your cost.
I also added a red LED to the box so that I knew when it was powered on, without having to check if the fan is spinning.




![Validate my Atom 1.0 feed [Valid Atom 1.0]](./images/valids/valid-atom10-yellow.gif)
![Validate my RSS 2.0 feed [Valid RSS 2.0]](./images/valids/valid-rss20-yellow.gif)