Fallout 3 Frag Grenade
My friend Keith Prince asked me if I could print this Frag Grenade from the computer game Fallout 3 so that he could paint it and make it part of his costume for cosplay.
Here's what he had to say:
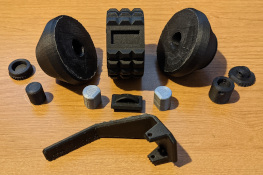
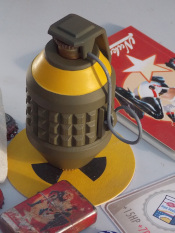
Anyone familiar with the Fallout computer game franchise will instantly recognise the ubiquitous “frag grenade” from Fallout 3. Loosely based on a real design, the Danish M1923, but with the familiar “chocolate block” exterior of the US WW2 “pineapple” grenade and an added safety handle, or “spoon”. Having wanted one of these in the real world outside of the game it was with great Xmas cheer that I received a 3D printed example from Gav’s World. The full-size model came in three main body parts plus some smaller elements manufactured from PLA, or Polylactic Acid, a popular material in the 3D printing world.
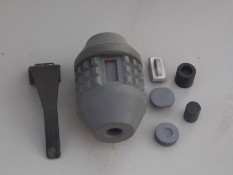
This was the first time I had built something fabricated from PLA and which had been 3D printed and both of these have some particularities that affect the way that a model is constructed and finished. First the material is slightly porous, though not obviously so, its surface can been sanded with progressively finer grades of wet-and-dry to give a very smooth finish with a sheen. For painting though something a little rougher is desirable. The body comes in conical top and base sections and a cylindrical mid-section. Looking closely at these parts it’s apparent that rather than being smoothly circular they are multi-facetted polygonal and the facets though small do need sanding to produce a smooth curvature and here PLA was rather more hard wearing than I had expected. The “choc block” middle piece is well suited to this type of manufacture and only the thin circular ends need careful rounding off. Parts have a thin layer on one surface which originally attached it to the base of the printing bed and has to be sanded off so parts are dimensional correct and to achieve a good fit. There are no instructions though an exploded view of the parts leaves no doubt where everything goes. The mid piece is laterally symmetric so it doesn’t matter which way round it goes between the top and bottom parts.
I used cyanoacrylate “super glue” to fix the body parts together. Here there is a specificity to PLA. It was a learning curve for someone used to joining polystyrene with solvent-type adhesives that weld parts together leaving no gap, super glues are applied here as a thin film so care has to be taken to ensure parts fit closely with no gaps. Here I was more successful attaching the top to the middle than with the bottom, where looking closely a thin gap remained which makes it look on close inspection like the bottom might be screwed on, but who’s to say in the real fictional world the base of the body isn’t screwed on, there must be a way of getting the explosive charge in there.
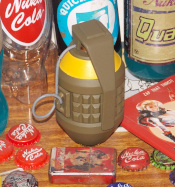
PLA will need priming and I found the initial coats kind of soaked in having to apply a number of coats formulated for plastic using aerosol spray. I found that the model required additional sanding after applications of initial primer coats as the grey highlighted where the faceted appearance remained to warrant further sanding. With sanding and several primer coats I was finally satisfied with the surface. The smaller external parts - the “spoon” or lever, top plunger, base plug and side D-piece – will also need the printing attachment layers removing, sanding and surface smoothing and priming. Some fitting will also be required. The lever and the small D-piece should be finished in the same colour as the body however the top “plunger” and base plug are meant to be exposed brass. I found a red plastic primer worked well here and finished them in brass spray paint. This can look too gold so used some bronze and even some of the red-brown primer judiciously to give an aged brass look, using some aged brass as reference. As the Fallout game is inspired by 1950s visuals I finished the body and lever in the Olive Drab used by the US Army during WW2 and the 1950s, replicated by Humbrol’s colour 155, available as an aerosol. A few coats were needed however anyone who has seen real grenades of the period will know just how rough a finish they had, being an expendable item a good finish was not exactly a requirement, so some imperfections in the model’s finish won’t look out of place. The Fallout Frag Grenade has a yellow band around the top section, this has a sprayed on looked in the game though the 3D printed version has this delineated by a recessed band and as masking and spraying the feature would be awkward and time consuming it was back to brush and paint.
Finally, there is the wire ring pull. A length of silver PLA was supplied too for this component. However, as I planned to take the item to events rather than just have it sit on a shelf I thought it could prove too flimsy so replaced it with some 2.3mm dia. piano wire as it fitted the preformed holes without drilling. It was a bad choice being high tensile spring steel and had to be annealed by heating to red heat in order to shape it. A softer material, mild steel, aluminium or brass, would have made things a lot easier. There is no profile guide accompanying the 3D original files so shaping was by reference to stills form the game.
In summary it was a learning curve and if I did it again I could do a slightly better job but nevertheless I am pleased with the finished job. It is a pretty accurate replica of the grenade in the game and would go with any collection of Fallout items or for cosplay. Vault Boy definitely approves.
Source:
https://www.myminifactory.com/object/3d-print-fallout-3-fallout-new-vegas-frag-grenade-96304
Grenade Casing
| Material: | Velleman matte black PLA |
| Temperature: | 200°C |
| Layer Height: | 0.1mm |
| Wall Thickness: | 2.0mm |
| Top/Bottom Thickness: | 2.0mm |
| In-fill: | 25% |
Grenade Lever
| Material: | Velleman matte black PLA |
| Temperature: | 200°C |
| Layer Height: | 0.1mm |
| Wall Thickness: | 0.7mm |
| Top/Bottom Thickness: | 0.6mm |
| In-fill: | 100% |
Small External Parts
| Material: | Velleman matte black PLA |
| Temperature: | 200°C |
| Layer Height: | 0.1mm |
| Wall Thickness: | 2mm |
| Top/Bottom Thickness: | 2.0mm |
| In-fill: | 100% |
Internal Parts
| Material: | Velleman silver PLA |
| Temperature: | 200°C |
| Layer Height: | 0.1mm |
| Wall Thickness: | 2mm |
| Top/Bottom Thickness: | 2.0mm |
| In-fill: | 100% |


![Validate my Atom 1.0 feed [Valid Atom 1.0]](./images/valids/valid-atom10-yellow.gif)
![Validate my RSS 2.0 feed [Valid RSS 2.0]](./images/valids/valid-rss20-yellow.gif)